Article
How Outsourced Accounting Can Alleviate Business Growing Pains
Effective May 21, 2023, P&N has joined EisnerAmper. Read the full announcement here.


As mentioned in our last Tips & Tricks article, the Select to Pay window is no longer available within the Sage Intacct Accounts Payable module. The new Pay Bills window means a process change for your accounting team. This article takes a deeper dive into the functionality within this Pay Bills window and offers some ideas to streamline your day-to-day workflow within Sage Intacct’s Accounts Payable application.
The Pay Bills window offers much more flexibility than the previous Select to Pay window. There are multiple ways to find the bills you wish to select for payment, as well as filter options that can be saved and used throughout your organization. On the Pay Bills page, you can:
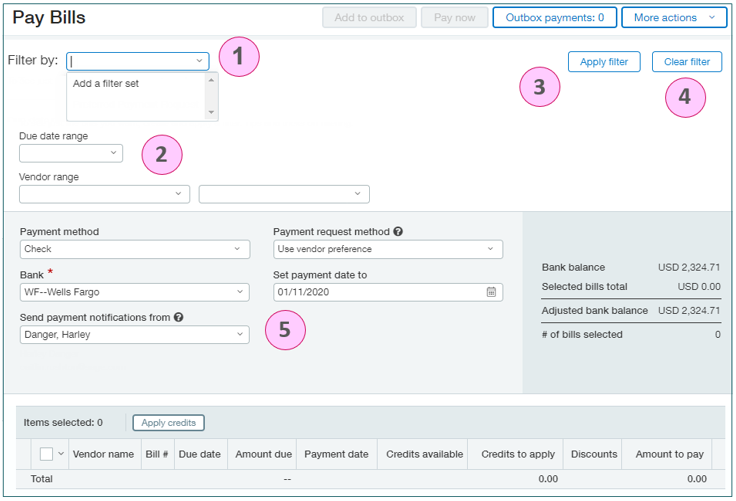
⇒ Important: The system displays a maximum of 1,000 bills at a time, so it is possible you won’t see all available bills unless you create more specific filters.
By default, bills will not load on the Pay Bills window until a filter is applied. Therefore, it is very helpful to create and save a few filter sets that allow you to quickly move through this window during your check printing process. With filter sets, each time you access the Pay Bills window, you can select and apply a filter with just a couple of clicks.
There are a few common filters that provide a good starting point for most users before diving into more complex filtering:
In order to create a filter set for current and future use, select Accounts Payable > All > Pay bills > Filter by. Here, you can find options to define the filter parameters that will be used when populating a list of bills to be selected for payment.
The Outbox task is a holding area for draft payment requests that you're not quite ready to fully process. Using the outbox can be highly efficient if you create multiple types of payment requests, such as requests that use different banks. In this scenario, you can use the Outbox as a mechanism to easily obtain the total of multiple payment requests for multiple banks and tie those to a total aging report. The Outbox holds and stores requests until you are ready to move them on for payment processing.
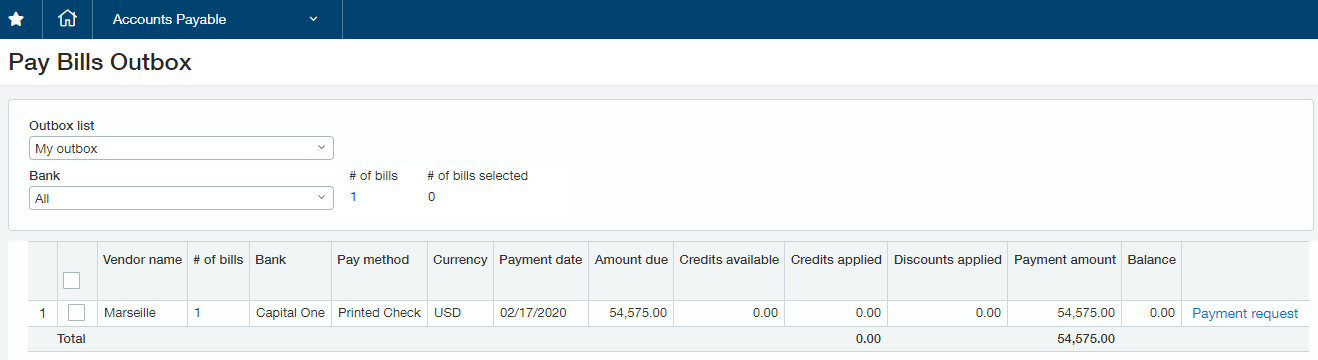
⇒ Important: When utilizing the outbox, it is important to note that a company generally has an outbox for each user who pays bills. Admin users can access all outbox payment requests.
You may realize during your payment process that a bill has been marked as paid that should not yet be included in the current payment processing. If you begin processing a payment and create a payment request in the Outbox, you can locate that payment request in the outbox of the Pay Bills window to complete the process or cancel the request. To remove one or more bills from a request, go to Accounts Payable > All > Pay Bills > Outbox and follow these steps:
⇒ Important: A payment request can't be empty. If the payment request consists of just one bill, remove the request itself by selecting Remove from Outbox.
We hope this walkthrough gives you a good starting point for using filter sets and helps you simplify your day-to-day Accounts Payable processes. Please contact us if you have questions about the Pay Bills window or any other Sage Intacct features.