P&N is now EisnerAmper

Effective May 21, 2023, P&N has joined EisnerAmper. Read the full announcement here.

Consulting Services • Published 10/28/2019 Sage Intacct Tips & Tricks: Have You Used Dimension Groups Yet?
by Skye Duhon 
SHARE THIS


As a Sage Intacct user, you are already aware of the solution’s multi-dimensional super powers. However, did you know that you can also create a limitless amount of dimension groupings for reporting purposes? Each of Sage Intacct’s standard dimensions may be grouped in as many different ways as you would like to report on your data. Gone are the days of using Excel for grouping and consolidating, Sage Intacct can do this for you! In this article, we will cover how to setup a dimension group, using dimension groups in your financial reports and standard reports, and examples of reports that may be useful for you.

Customer Dimension Use Case

Defining a dimension group gives you additional control over what appears in reports and dashboards. If you would like to be able to filter for a set of members (such as specific customers, vendors, or location), consider setting up dimension groups. Once you've defined a dimension group, it will automatically be available in your Sage Intacct filters along with the individual dimension members.

For example, you may wish to report on a certain type of customer. A customer dimension group can be created to give you this additional control over reporting. With this new dimension group, you can:

  • Filter reports to show data on a particular type of customer or customer industry (e.g. Education, Financial Services, Technology).
  • Filter reports to show data from customers that meet certain criteria, even performing "top 10" and "bottom 10" matches.
  • Control the order in which the customers appear in reports.
  • Dynamically include certain customers based on criteria selected at the time you run a report.

Setting Up a Dimension Group

The way you set up a dimension group depends on how you plan to use it in reports. Here are the steps to create your own dimension group (using the customer dimension as an example):

    1. Go to the Reports menu, click the Setup tab and select Dimension Groups.
    2. Click the plus icon next to Customer.
    3. Enter an ID and name for the group. Filters for reports will list the ID and name together (IDName), as in TECH—Technology.
      • IDs can't be changed once you've saved the group, but you can edit the name at a later time.
    4. From the Group Type drop-down menu, select the type of group you want to create and then define the group.
      • All Members group type
        1. Use the Filters list to narrow the list of customers based on specific fields. In this example, you might want to select customers within a certain Industry (defined as a custom field on the customer record).
        2. Select the field (in this example “industry”) on which you want to filter.
        3. Choose the operation and value you want to filter for.
          • The options you see depend on the field chosen.
          • By default, if you add more than one filter, customers are included only if they match all criteria. However, you can change this behavior using the Filter conditions drop-down menu:
            • All (AND) - Include customers that match all criteria (the default).
            • Any (OR) - Include customers that match any single criteria.
            • Expression - Uses an expression that you define to apply the filters. For example, the following expression matches customers that either meet criteria 1 and 2, or that meet criteria 3. (1 AND 2) OR 3
        4. Use the Max Matches field to limit the number of customers displayed to present a “top 10” report.

      • Specific Members group type
        • Use the Members list to select the specific customers to include. The sort order selected here will be used in any reports that show customers in columns or rows. Drag and drop to reorder.
          • Filters are not needed, since you have already selected the members.
          • For custom financial reports that you previously created, customers will continue to be listed in alphabetical order by default. However, you can start using the order defined in your customer groups by deselecting the option to Alphabetically Sort Customer/Location Group on the Format tab of the Report Wizard.

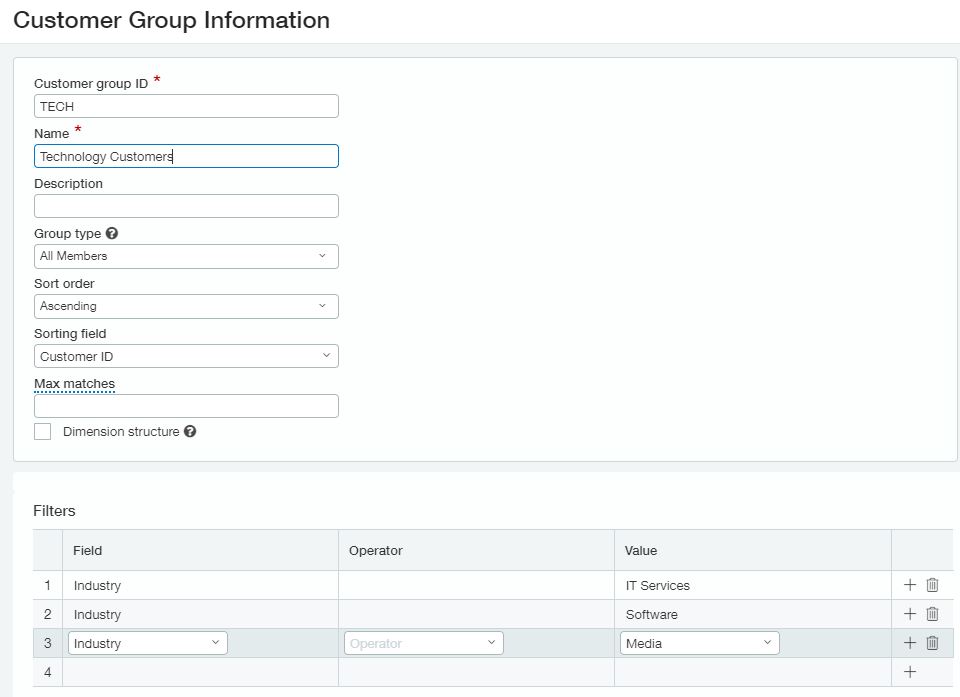
Finally, select the Dimension Structure option to automatically create a dimension structure that enables the group to be used on the rows or columns of financial reports (more on this this is detailed below). If you don’t create a dimension structure for the group, you will only be able to use the group for filtering.

You can also optionally specify how dimension members should be sorted when displayed in reports using the Sort Order and Sorting Field dropdown lists.

Using Dimension Groups in Your Sage Intacct Reports

Dimension groups can be used to filter financial reports (such as balance sheets and income statements) and other General Ledger reports (including General Ledger, Journals, Trial Balance, and Account Balance reports). When you filter the reports, all of your dimensions and defined dimension groups are automatically available to you. Without making any changes to the report itself, you can filter for a particular customer type, vendor location, and so on.

Filtering Financial Report Data

When you create or edit a financial report, you can select specific dimension filters. When you’ve defined dimension groups, these groups will be available to you in addition to individual dimensions. You can also select to have the report prompt you for your choice at the time the report is run.

For example, you could create a profit and loss statement that is filtered for a particular customer or customer group, or you could use a prompt to allow you to pick any customer or customer group at the time that the report is run. Follow these steps to edit the dimension options:

  1. Edit the financial report (General Ledger > Financial Reports > Edit > Filters)
  2. Select the dimension filters that you wish to use, or select the ones for which you would like to be prompted.
    • If you want to be able to choose a dimension member or dimension group at the time that you run the report, select the Prompt option next to the dimension. This allows you to create one report and use it multiple ways, such as running the report for different customer groups or location groups on-the-fly.
    • If you select specific dimension filters and also choose the Prompt option, the report prompt will be prefilled with your selections but you'll have the opportunity to override the filters.

Showing Dimensional Data in Report Columns or Rows

If you have selected the Dimension Structure option within your newly-created dimension group, you gain additional functionality within financial reports. By expanding columns or rows by dimension you can compare data across customers, locations, or any other dimension. This allows you to, for instance, compare revenue across types of customers or compare asset expenses by location. When comparing columns or rows by dimension, the dimension filters that you apply determine which members of the dimension appear in columns or rows. If you select a dimension group that lists specific members, the order in which the members are listed in the group is the order that they will appear in rows and columns.

Creating Individual Reports by Dimension Group

When you expand rows or columns by a dimension, the report automatically combines the data together in a single report. If you select the Run as Individual Reports option next to the dimension filter, a separate report is generated for each dimension when the report is printed to PDF.

Filtering Other General Ledger Reports

You can use dimensions and dimension groups to filter most reports in the General Ledger, including the General Ledger, Journals, Trial Balance, and Account Balance reports. When you select the report from the menu, you'll be prompted to select any filters you wish to apply.

Examples for Using a Dimension Group

Here are some examples of how you might consider using dimension groups within your next custom Financial Report:

  • Department groups
    • Specific departments
    • By manager
    • By parent department
  • Location groups
    • Specific locations
    • By manager
    • With a particular base currency
  • Item groups
    • By item type
    • By tax status (taxable = true or false)
  • Vendor groups
    • By vendor type
    • With a payment priority of urgent
  • Employee groups
    • By earning type (hourly or salary)
    • By manager
    • With salaries greater than a specific amount
  • Customer groups
    • By customer type
    • By region
    • By industry
  • Project groups
    • By project type (for example, billing type = time & materials)
    • With a budgeted billing amount greater than a certain amount
    • With an active status
    • That are billable (customer is not empty) and not complete (% complete is < 100)
  • Classes
    • With the same parent class
    • That are active or inactive
    • By description

If you have questions about Sage Intacct or its functions, contact our team and we will be happy to help.

Read Part 1: General Ledger Reports

Read Part 2: The Interactive Custom Report Writer

Scroll to Top